

I’m a sim racer with a passion for Motorsport, good racecraft and the tech side of sim racing. I made SIMRACINGCOCKPIT.GG as a place to share my experiences. I hold an International Class C race licence and write for sim racing store G-Performance and Motorsport resource Driver61.com
Featured image: Iglcoatings-eracing
We’ve all been there. You feel like you’re driving your absolute fastest, then another driver enters the session and pops in a lap time that is 2 seconds faster than you. Heartbreaking, isn’t it? If you feel like you’ve hit a bit of a performance plateau in your iRacing lap times, and you’re wondering how the “pros” are 2s faster than you, hopefully, this article will point you in the right direction (excuse the pun!).
How to get faster in iRacing
Adjust your Camera Angle and FOV Properly
It goes without saying that a well-adjusted FOV (Field of View) makes a lot of difference. As I’ve written in our guide to properly adjusting your FOV, it takes a bit of investment in time to learn, but getting FOV right will improve your lap times. Potentially, quite dramatically!
Once you’ve set up your FOV there are a few extra tweaks you can make. Adjusting your camera position in the Cockpit replay mode really just changes your view from inside the cockpit, and keeps the FOV precisely the same.
In iRacing, turn a few laps, and jump out of the car. This puts iRacing in replay mode. Go to your cockpit camera by hitting CTRL+F12 to open the camera settings.
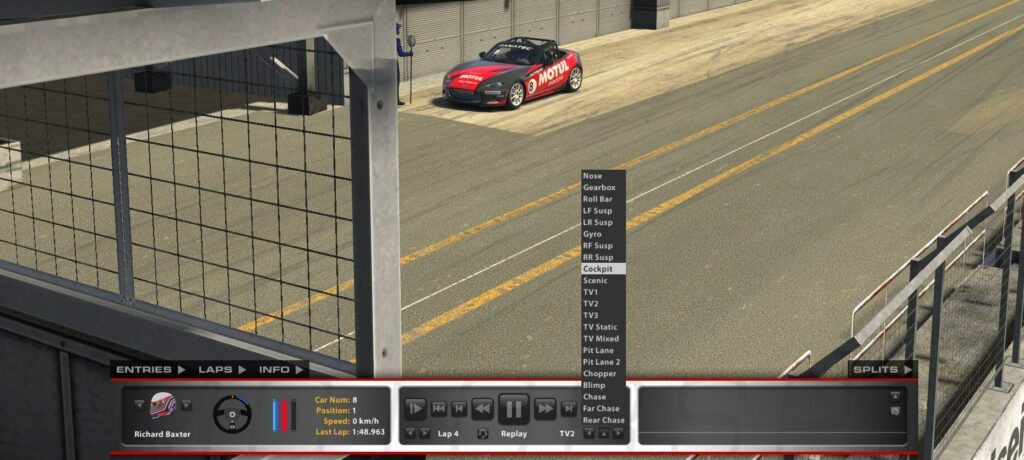
This will bring up the camera edit menu which offers lots of different options to adjust the position of the “camera” (your view inside the cockpit). You can literally move your driver’s head around in the cockpit; adjust left / right alignment and FOV.
The camera settings look like this:
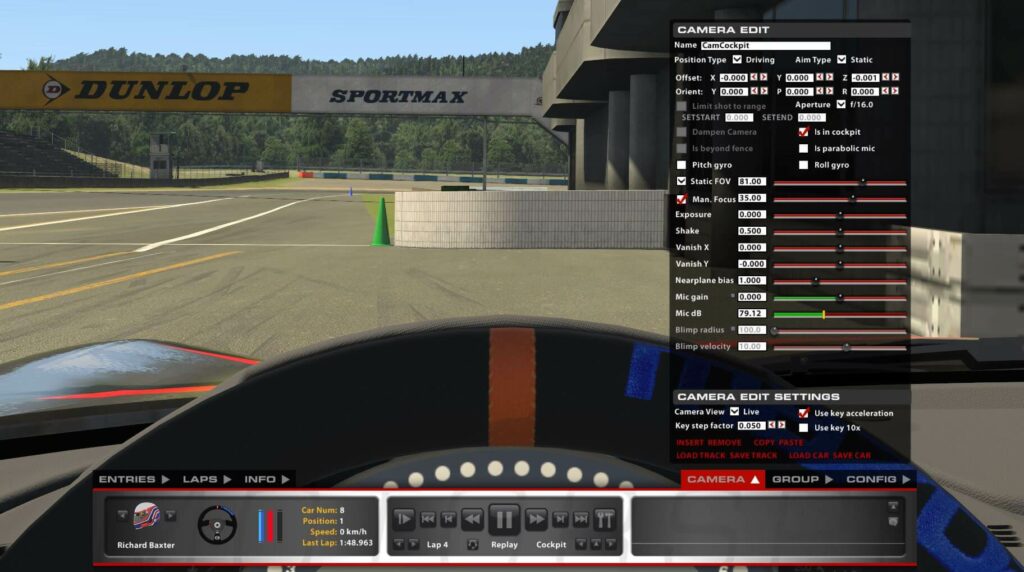
It’s important to note that once you have your FOV set correctly, the camera position is pretty subjective.
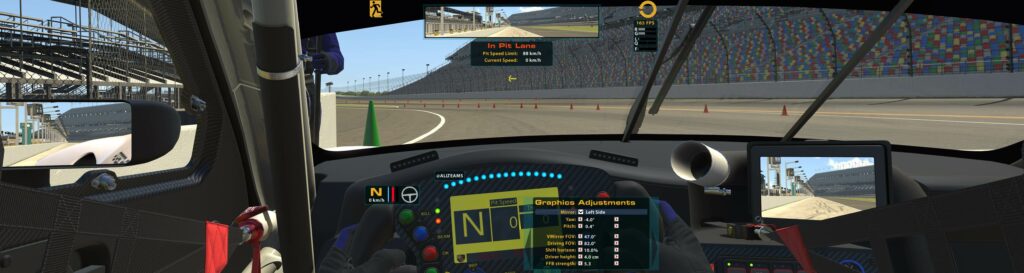
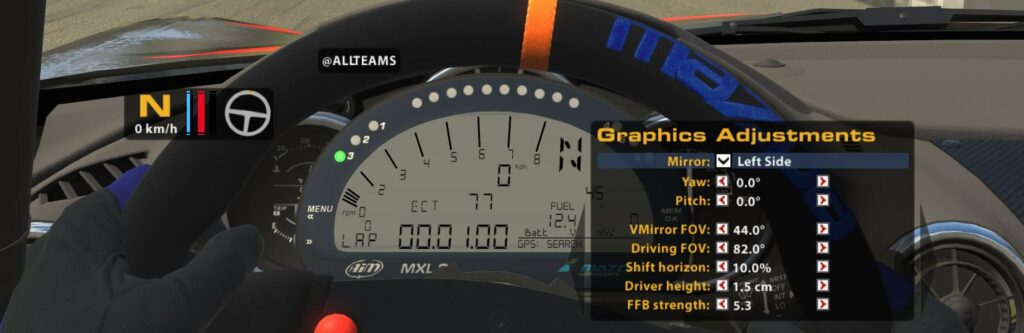
But, it’s wise to set it up in a way that means you can see at least one of your wing mirrors. Adjusting your driver height gives a far better perspective depending on the car you’re in. Get it right and that extra visibility will help you get quicker, the trick is just not to go too far and it’s doubly important to practice with your new settings.
The golden rule is that seeing as much of the track as possible is more useful as a driver than seeing your cockpit!
Setting the horizon correctly is also a powerful trick. Make sure that the horizon line matches your eye level, and do this before you make any other changes to the camera position.
Use Tyre Noise
To adjust the audio balance of iRacing’s sound output, head to Options > Sounds:

In your audio settings, make sure the audio volume from your tyres is quite loud.
The tyre noise gives you feedback about what the car is doing. Are you locking your tyres, understeering, or sliding – each of these characteristics are first communicated by tyre noise. So, it’s the most important sound you can get because it’s useful information.
Buttkickers operate on this principle too, so for even more tyre information, make sure that tyre noise is emphasised over any of the other settings in Hapticonnect.
Understand Slip Angle
Slip angle is a natural phenomenon observed in racing – put simply, as you rotate the car into a corner, the rear moves laterally across the circuit. The car looks like it’s sliding around the corner but only in the right amount.

Slip angle describes how many degrees of rotation there are between where your tyres are facing and the direction of the track itself as you drive through the corner. It can get extremely technical if you’re an F1 team:

Using slip angle works because you are using all of the available grip on the tyre. And, if you know how to get access to “the maximum available grip” on a simulated tyre, you’re going to get faster.
The “sweet spot” for slip angle is very low – certainly no more than 10 degrees. More than this, you’re probably asking too much of the tyres and they’ll let go. Resulting in excessive oversteer or even a spin.
Using slip angle is really just the next level of awareness of what your car is doing after you’ve perfected trail braking.
As you approach a corner, you “trail off” (gradually reduce your brake pressure) as the car rotates into the corner. As you brake, the weight transfer moves towards the front tyres. This gives the front more grip but reduces grip at the rear. So, as the car turns, the rear can slide. Controlled correctly, the rear enters a state of slip angle allowing you to get the car turned for the apex allowing you to get on the power earlier.
Here’s a really useful visualisation of the difference between a good mid-corner phase (using the right amount of slip angle) vs a less efficient mid-corner:

The car on the left has used just the right amount of rotation into the corner, so now, as it prepares for the exit, the driver can get on the throttle earlier. Compare this to the car on the right which is clearly less well-prepared and still needs to complete the turn before the driver can get on the throttle.
Imagine for a moment that you got on the throttle a tenth earlier at this point. You’ll now carry that advantage all the way to the next corner. So there’s lap time to be gained in the corner but on the following straight, too.
This technique takes time and “feel”. Use the tyre noise to gauge how much slip is occurring and feel whether this slip is too much or too little.
Use Your Vision
To get the exact amount of rotation for corners perfected, there’s a critical lesson to be learned. Think about where you’re looking.
As you approach a corner, your eyes are locked on the apex (hence the phrase “sighting the apex”). But too many drivers stop thinking at this point and just feel the need to get on the throttle. A better technique is to move your vision to sight the exit at the earliest opportunity. In fact, as soon as you’re in the braking zone you should already have moved your eyes towards the exit of the corner. This information will tell you whether you’ve got the car turned enough yet to fully lift off the brakes and start the exit under the throttle.

Combine an understanding of slip angle with an acceptance of the importance of using your eyes in the right way and, with the tyre audio giving you lots of useful new information, you’ll soon settle into a driving mode that helps you find even more lap time.
Related articles:
Topic: iRacing