

Sim racing and esports journalist. Occasional Motorsport photographer, eSports competitor and distinctly average cyclist.
Featured Image: Ross McGregor
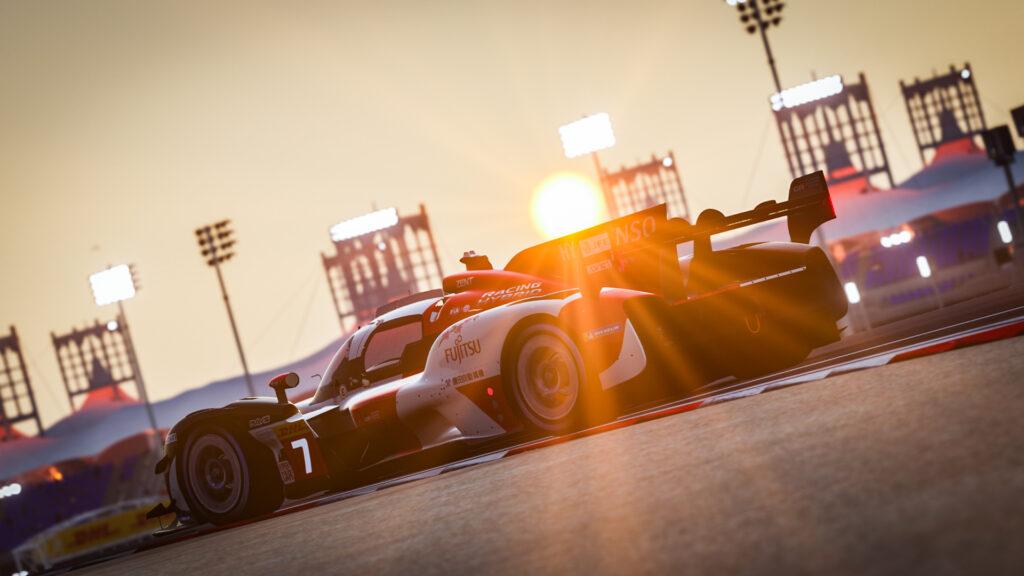
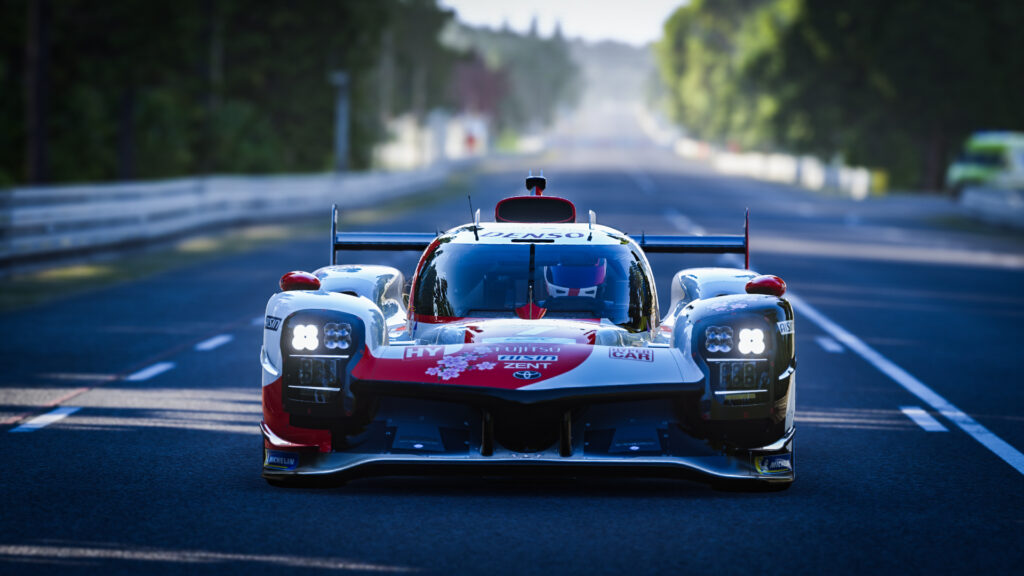
Studio 397 and Motorsport Games’ ode to endurance racing is finally out via Steam Early Access and it’s fair to say that the sim racing community has been impressed with the way Le Mans Ultimate looks.
As players get to grips with the mighty Hypercars, LMP2s and GTEs in-game, many have managed to capture some incredible screenshots of the cars in action, highlighting the sim’s sumptuous visuals and backed up by its impressive day/night cycle and changeable weather systems.
Le Mans Ultimate’s (LMU) predecessor, rFactor 2, has an excellent photo mode so it’s somewhat surprising to see it absent in Studio 397’s latest sim. However, with a little know-how, you can create some beautiful images.
Find out more below.
Map of the Problematique
Before diving headfirst into virtual photography, you’ll unfortunately have to delve into the LMU’s slightly janky user interface. Yes, I know it can be a pain but the rFactor 2-derived menus are laid out much better than they would’ve been had Studio 397 not overhauled rFactor 2’s UI in 2022.
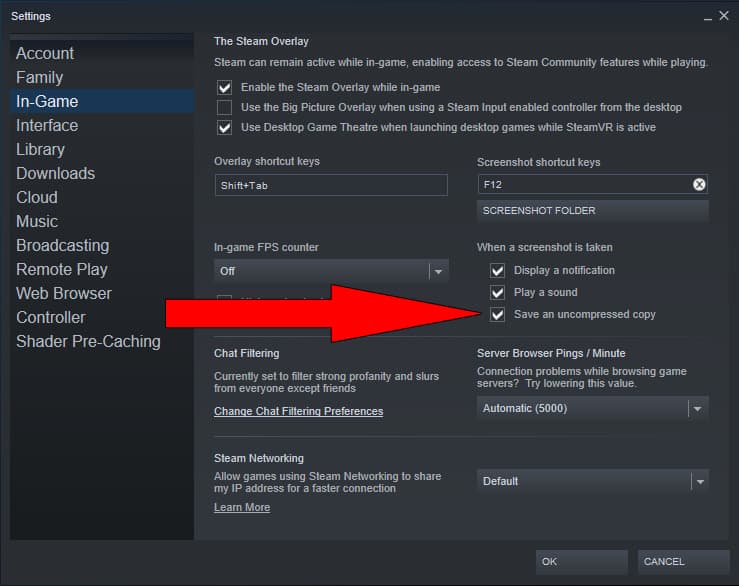
The first port of call is to enable Steam to save your screenshots (taken using the F12 key) in the best available file format. Go to Steam’s ‘Settings’ drop-down menu, select ‘In-Game’ and tick the ‘Save an uncompressed copy’ box. This will save Steam screenshots as PNG files instead of jpegs.
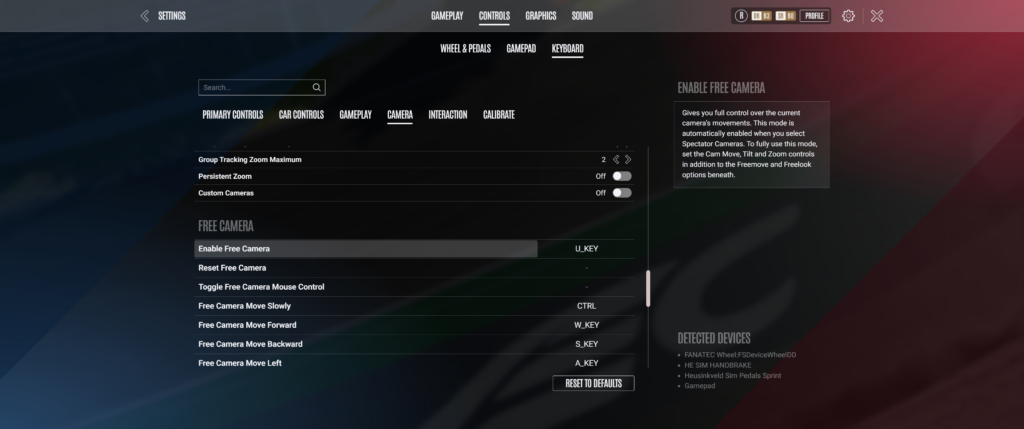
Next, we need to find the correct menu to map LMU’s photo mode controls. Luckily, these are similar to rFactor 2’s, with options to change aperture, focus and exposure. It can be found under the ‘Free Lens’ sub-menu, as shown below.
You will also have to map the ‘Enable Free Camera’ and ‘Enable Free Lens’ functions as these will be vital when capturing images later.
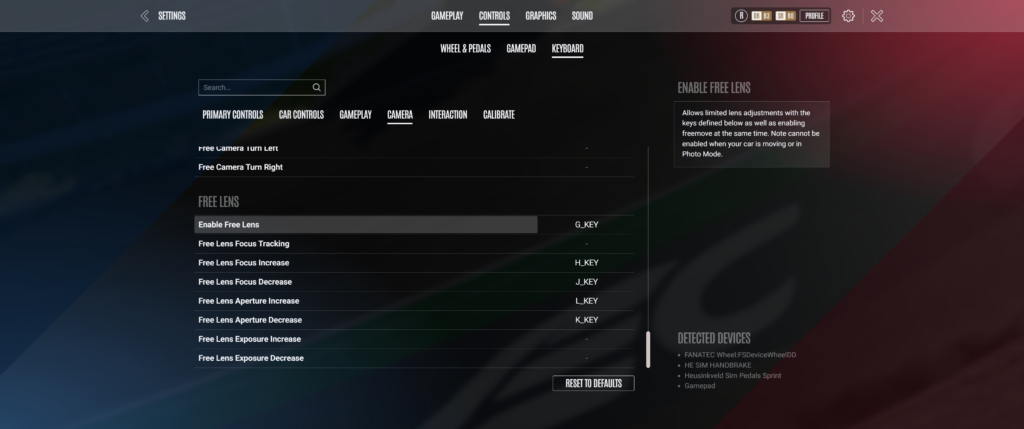
Mapping ‘Free Camera [direction]’ is also required, and it’s worth assigning a key for ‘Free Camera Move Slowly’ to help you fine-tune your virtual camera’s position. You may also find it easier to map these controls to a gamepad.
You should also assign buttons (or keys!) for the ‘Cam zoom In/Out’ commands, which act like a telephoto lens’ zoom, increasing or decreasing the field of view of the on-screen action.
Although not set up by default, LMU has an instant replay function, where up to three minutes of footage can be viewed. However, this replays the action in a trimmed-down letterbox style, which isn’t ideal.
A workaround for this is to escape back to the garage where you can watch your run back in your native screen resolution. I find this the best way to capture images, but you’ll still have to increase your instant replay length to three minutes to get the best out of it.
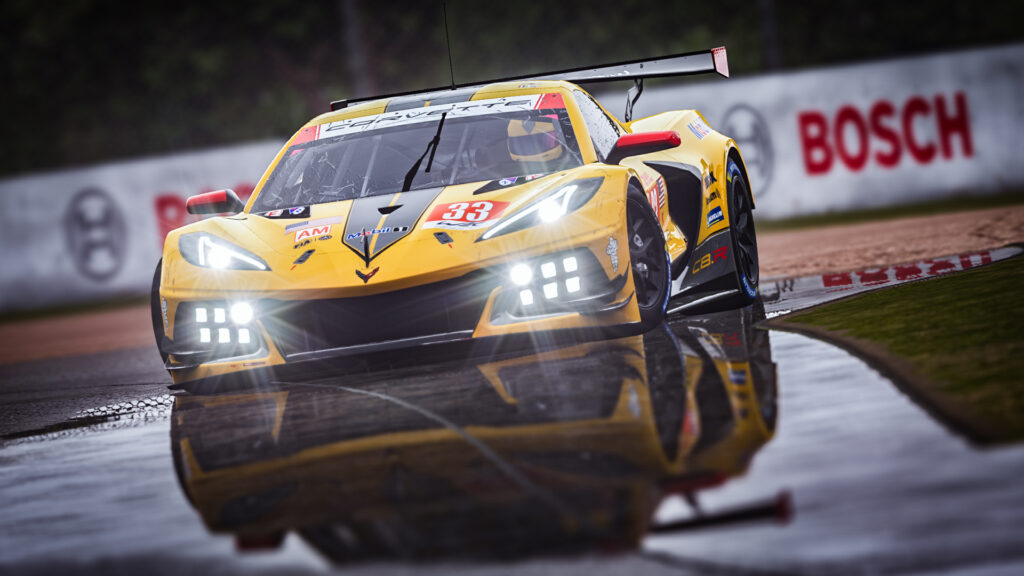
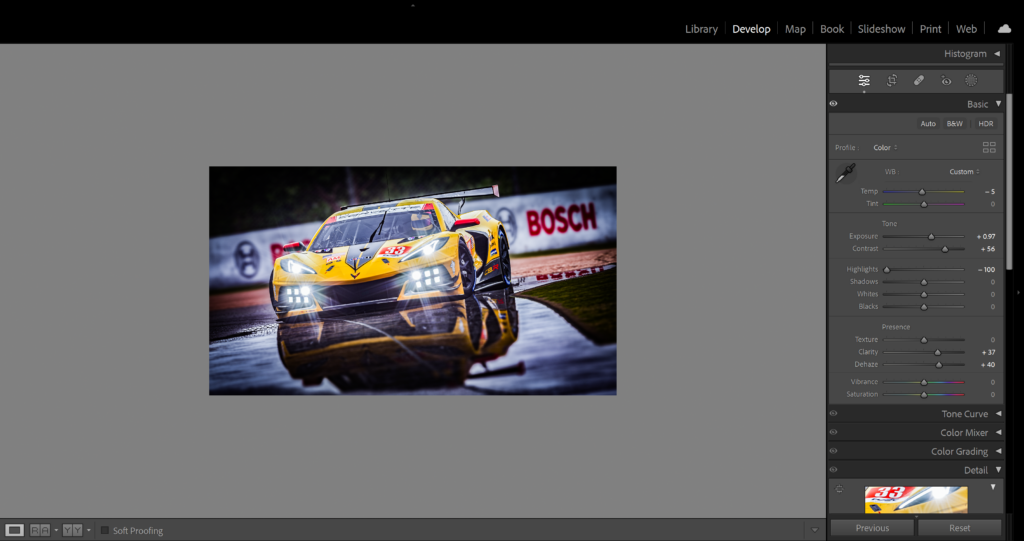
Alternatively, while driving in-game you can switch cameras and fiddle with lens settings to take screenshots in real-time, but this is only advisable if you’re trying to nail a good static shot of your car and need to line it up just so – like in the image below, where I’ve managed to manoeuvre a Chevrolet Corvette C8.R GTE next to a rather attractive puddle (yes, I know, the headlights don’t appear in the reflection, it seems to be a bug as the rear headlights worked just fine!).
Graphics
Naturally, you’ll want your images to look as good as they possibly can, so crank up LMU’s graphics settings as high as your PC will allow. As far as key settings go, enabling motion blur will ensure your car has blurred wheels when taking panning shots, while setting ‘Post Effects’ to ‘High’ will allow the swanky depth of field effects that’ll make your LMU screenshots shine.
One thing to note is that if you want to take screenshots of AI cars, ensure you’ve set ‘Opponent Detail’ to full; otherwise, computer-controlled cars will look a little rough around the edges.
Taking photos
Now that you’ve prepared LMU’s graphics and key bindings, it’s time to grab some awesome images.
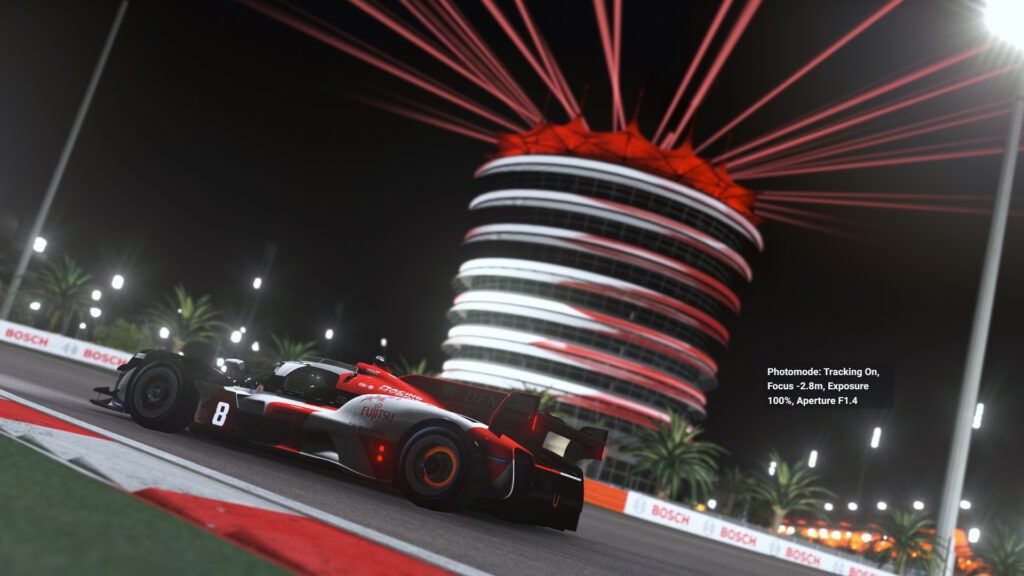
The three main functions you can change are aperture, focus and exposure. Now, altering exposure isn’t strictly required – except for the darkest of backdrops – so the main two factors in LMU’s unofficial photo mode are aperture and focus.
Note: remember to press the ‘Enable Free Lens’ key you mapped earlier to allow changes to these settings!
Aperture
The aperture is the opening on a camera that allows light in. When fully open (lower f-stop numbers), it allows more light in and creates blurrier foregrounds and backgrounds. A narrower aperture (higher f-stop numbers) is more likely to produce a static image where the background and foreground are in focus.
Naturally, for a lovely depth-of-field effect you’ll want to stick with lower f-stop numbers, but you’ll have to balance this against keeping the action in focus. For example, too low an f-stop number might mean the back of your target car is blurred while the front is in focus (which can look great too, depending on what you’re trying to achieve).
Focus
Pick a point on your image you want to focus on and change the focus meterage values until it sharpens up. Balance focus settings with ‘Cam Zoom In/Out’ and aperture to achieve the optimal amount of background blur, while also maintaining perspective on your subject matter.
Exposure
As already discussed, exposure won’t always need to be changed, but it essentially lightens or darkens your image. For me, I prefer to work with just aperture and focus in-game then adjust exposure (and many other settings) in Adobe Lightroom later.
Snapshot
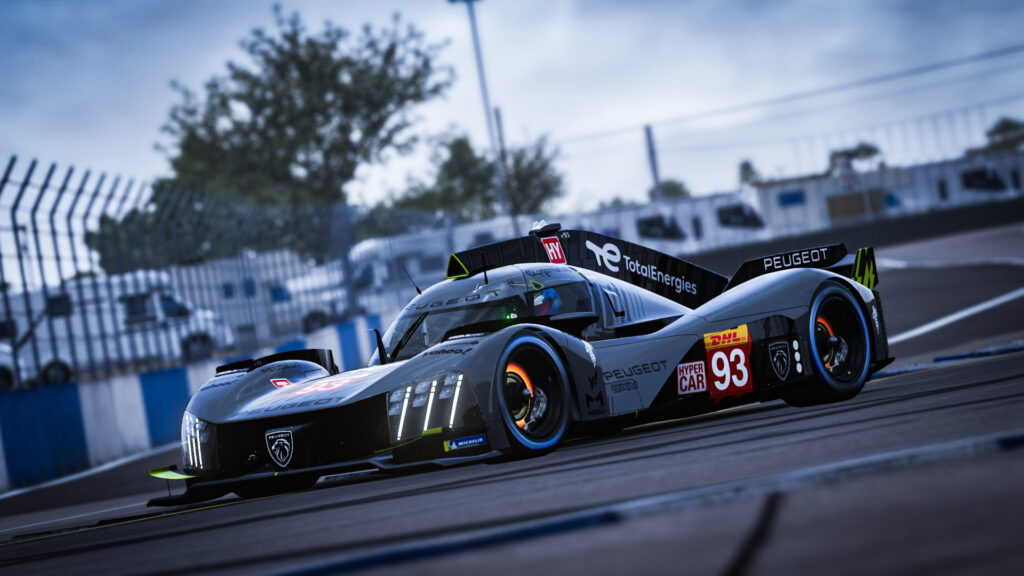
From LMU’s Early Access build I’ve found the best way to take screenshots is to view your car using the game’s many trackside cameras. The reason for this is they already track your car perfectly (so it’s already in focus), plus they have pre-baked depth-of-field effects.
After selecting a trackside camera, hit the ‘Free Camera Move’ key and move the camera into your desired position, adding tilt if required. From here, adjust zoom (for field of view adjustments), press ‘Enable Free Lens’ and then alter the aperture and focus settings to your taste.
When happy with your image, hit Steam’s F12 screenshot key and move on to the (optional) final step.
Lightroom edits
Using software such as Adobe Lightroom can elevate your virtual photography up several notches and is something I regularly do to enhance my images. Once you’ve cropped your screenshot, I find that increasing the clarity, contrast and dehaze settings makes the image more vivid, with an increase in exposure helping lighten things back up.
I’ve outlined my baseline settings below.
Feel free to experiment to see what works best for you, though, and perhaps add a little post-crop vignetting under the ‘Effects’ tab.
Happy snapping!
For more of my Le Mans Ultimate images check out my Flickr page, where I also showcase my real-world motorsport photography.